Trading in an old iPhone often feels simple. You upgrade to a newer device, transfer photos, and hand the old phone over.
Understanding how to erase iPhone for trade in involves more than pressing “Erase All Content and Settings.” Backups, Apple ID removal, Find My settings, and final checks all influence whether the process actually protects your data.
1. Back Up Your Data Before You Erase iPhone For Trade In
Before learning how to erase iPhone for trade in, save important information first. Erasing an iPhone removes:
- Photos
- Messages
- Contacts
- Apps
- Saved settings
- Documents
Option 1: Back up using iCloud
Open: Settings -> Your Name -> iCloud -> iCloud Backup -> Back Up Now
Wait until the backup finishes before continuing.
Option 2: Back up using a computer
Connect the iPhone to:
- Mac (Finder)
- Windows PC (Apple Devices app or iTunes, where applicable)
Create a complete backup before erasing. This step matters because how to erase iPhone for trade in should begin with protecting information rather than deleting it immediately.
2. Sign Out Of Apple ID and Turn off Find My iPhone
Removing your Apple ID is an essential step in how to erase iPhone for trade in because it disables Activation Lock and helps avoid issues for the next owner or trade-in provider. If skipped, the device may remain linked to your account even after all data is erased.
Step 1: Open Apple ID settings
Go to: Settings -> Your Name
This section contains account settings connected to:
- Apple ID
- iCloud
- Find My
- App Store purchases
- Connected devices
Step 2: Sign out of your Apple ID
Scroll down and tap: Sign Out
Your iPhone may ask for:
- Apple ID password
- Device passcode
Enter the required information to continue, which partly explains why how to erase iPhone for trade in involves account verification before disconnecting the device from your Apple ID.
Step 3: Turn off Find My iPhone
Open: Settings -> Your Name -> Find My -> Find My iPhone
Toggle: Find My iPhone -> OFF
You may need to enter your Apple ID password again. Turning off Find My removes the device from Apple’s tracking and activation system.
Step 4: Confirm the device has been removed from the account
After signing out -> return to Settings, your Apple ID name should no longer appear at the top.
This helps confirm the iPhone is disconnected successfully. Missing this step can lead to Activation Lock problems afterward, which is one reason why erasing an iPhone for trade-in includes removing the Apple ID before deleting data.
>>> Read more: How to Free Up Space on iPhone: Easy Ways That Actually Work
3. How to Erase iPhone for Trade-In Using Settings
Once backups are complete and your Apple ID has been removed, you can erase the iPhone itself. This step deletes personal data, apps, settings, messages, and stored accounts, preparing the device for trade-in.
Step 1: Open reset settings
Open Settings -> General -> Reset iPhone or Transfer.
Near the bottom, select:
Erase All Content and Settings
Your iPhone may display a summary showing what will be removed, which helps clarify how to erase your iPhone for trade-in before permanently deleting personal data.
- Apple ID information
- Apps
- Photos and videos
- Messages
- Wallet data
- Settings
Review the information before continuing.
Step 2: Tap erase all content and settings
Select: Continue
The device may remind you to complete backups if one has not been created recently. This provides a final chance to save important data before deletion.
Step 3: Confirm your identity
For security reasons, Apple may request:
- iPhone passcode
- Apple ID password
Enter the required information to confirm ownership, which partly explains why erasing an iPhone for trade-in includes security checks before resetting the device.
Step 4: Wait for the erase process to finish
After confirmation, the iPhone begins removing all stored data. The process may take several minutes, depending on:
- Device model
- Storage size
- Amount of saved data
Avoid turning off the phone during this stage. The device will restart automatically once finished.
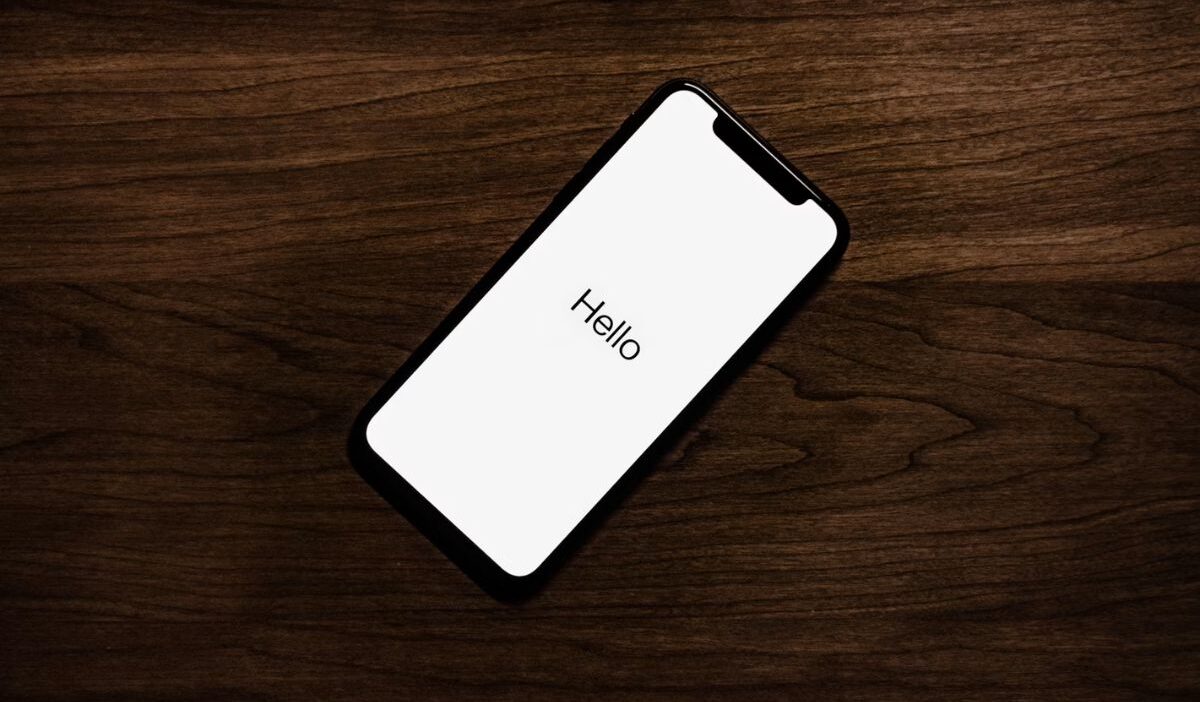
Step 5: Check for the Hello setup screen
When erasing succeeds, the iPhone should display the: “Hello” setup screen
This screen usually indicates the device has returned to factory settings and no longer contains personal information. Seeing this final screen helps confirm how to erase iPhone trade-in was completed correctly before handing the device to a buyer or trade-in provider.

4. Remove SIM Card And Disconnect Accessories
After resetting the iPhone, remove anything still linked to the device before trade-in.
This may include:
- Physical SIM card: Remove it using a SIM eject tool to prevent leaving phone numbers or carrier information behind.
- Phone case or screen protector: Some trade-in programs request only the device itself.
- Accessories: Chargers, cables, or boxes may affect trade-in value depending on requirements.
If your iPhone has an eSIM, make sure any required carrier transfer or deactivation process is completed separately.
5. Double-Check That Your iPhone Is Fully Erased
Before handing over the device, take a final minute to confirm everything was removed correctly.
Check:
- The Hello setup screen appears
- Apple ID is no longer connected
- Find My iPhone is disabled
- Personal photos, messages, and apps are unavailable
- The physical SIM card has been removed
This final review reduces the risk of leaving personal information behind and partly explains why erasing an iPhone for trade-in involves verification rather than erasing alone.
>>> Read more: How to Recover Deleted Photos from iPhone Before They’re Gone Forever
6. FAQs
Do I need to remove my Apple ID before trading in?
Yes. Removing Apple ID and disabling Find My iPhone prevents Activation Lock and allows the next owner or trade-in provider to use the device properly.
Will erasing the iPhone delete everything permanently?
Yes, for everyday users. Erasing removes personal data and settings, though backups stored elsewhere remain available.
What happens if I forget to erase my iPhone before trading it in?
Personal information may remain accessible, and your Apple account could stay linked to the device. Contact the trade-in provider quickly if this happens.
Conclusion
Learning how to erase iPhone for trade in means protecting data before removing it. Backups, Apple ID removal, Find My settings, and final verification all work together.
The useful takeaway is simple: A successful trade-in is not only about wiping the phone. It is about making sure nothing personal remains connected afterward.